
This post is co-written with HyeKyung Yang, Jieun Lim, and SeungBum Shim from LotteON.
LotteON aims to be a platform that not only sells products, but also provides a personalized recommendation experience tailored to your preferred lifestyle. LotteON operates various specialty stores, including fashion, beauty, luxury, and kids, and strives to provide a personalized shopping experience across all aspects of customers’ lifestyles.
To enhance the shopping experience of LotteON’s customers, the recommendation service development team is continuously improving the recommendation service to provide customers with the products they are looking for or may be interested in at the right time.
In this post, we share how LotteON improved their recommendation service using Amazon SageMaker and machine learning operations (MLOps).
Problem definition
Traditionally, the recommendation service was mainly provided by identifying the relationship between products and providing products that were highly relevant to the product selected by the customer. However, it was necessary to upgrade the recommendation service to analyze each customer’s taste and meet their needs. Therefore, we decided to introduce a deep learning-based recommendation algorithm that can identify not only linear relationships in the data, but also more complex relationships. For this reason, we built the MLOps architecture to manage the created models and provide real-time services.
Another requirement was to build a continuous integration and continuous delivery (CI/CD) pipeline that can be integrated with GitLab, a code repository used by existing recommendation platforms, to add newly developed recommendation models and create a structure that can continuously improve the quality of recommendation services through periodic retraining and redistribution of models.
In the following sections, we introduce the MLOps platform that we built to provide high-quality recommendations to our customers and the overall process of inferring a deep learning-based recommendation algorithm (Neural Collaborative Filtering) in real time and introducing it to LotteON.
Solution architecture
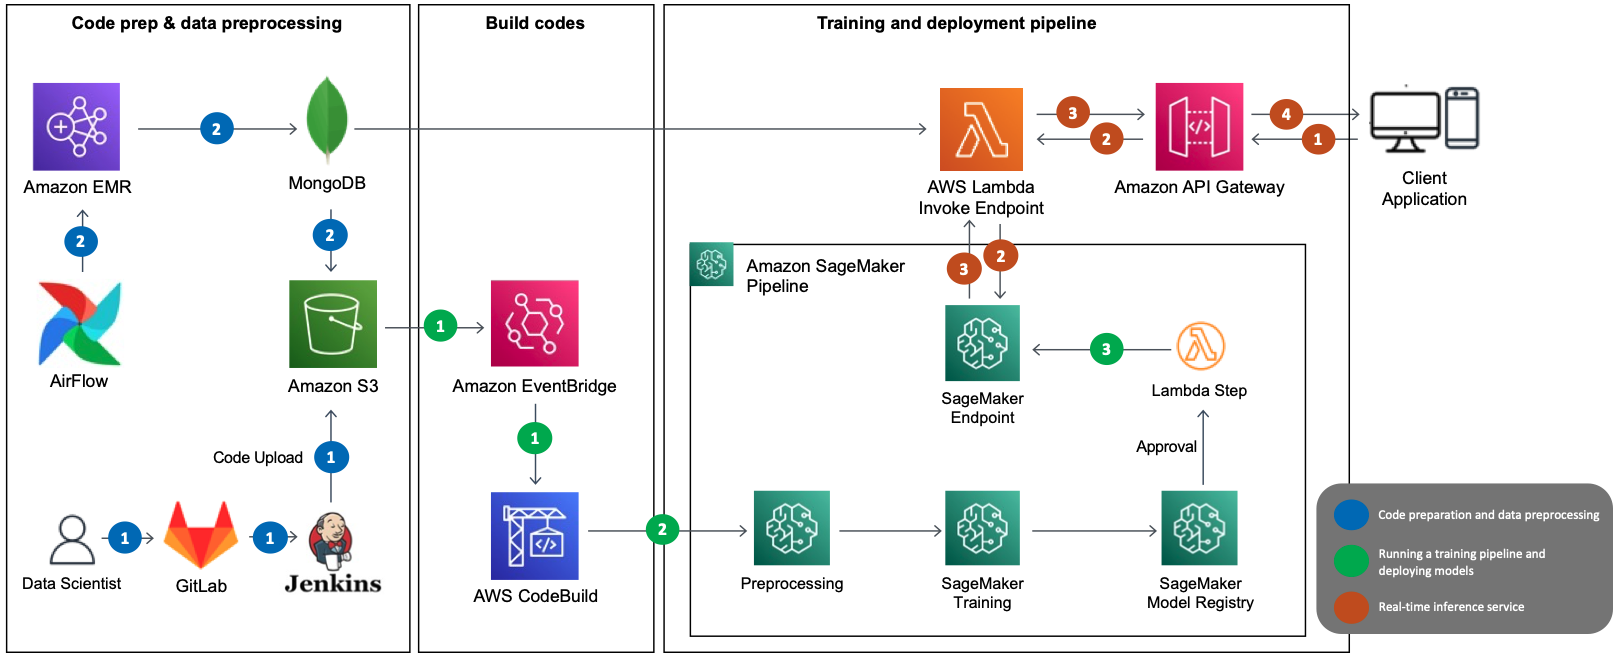
The following diagram illustrates the solution architecture for serving Neural Collaborative Filtering (NCF) algorithm-based recommendation models as MLOps. The main AWS services used are SageMaker, Amazon EMR, AWS CodeBuild, Amazon Simple Storage Service (Amazon S3), Amazon EventBridge, AWS Lambda, and Amazon API Gateway. We’ve combined several AWS services using Amazon SageMaker Pipelines and designed the architecture with the following components in mind:
Data preprocessing
Automated model training and deployment
Real-time inference through model serving
CI/CD structure
The preceding architecture shows the MLOps data flow, which consists of three decoupled passes:
Code preparation and data preprocessing (blue)
Training pipeline and model deployment (green)
Real-time recommendation inference (brown)
Code preparation and data preprocessing
The preparation and preprocessing phase consists of the following steps:
The data scientist publishes the deployment code containing the model and the training pipeline to GitLab, which is used by LotteON, and Jenkins uploads the code to Amazon S3.
The EMR preprocessing batch runs through Airflow according to the specified schedule. The preprocessing data is loaded into MongoDB, which is used as a feature store along with Amazon S3.
Training pipeline and model deployment
The model training and deployment phase consists of the following steps:
After the training data is uploaded to Amazon S3, CodeBuild runs based on the rules specified in EventBridge.
The SageMaker pipeline predefined in CodeBuild runs, and sequentially runs steps such as preprocessing including provisioning, model training, and model registration.
When training is complete (through the Lambda step), the deployed model is updated to the SageMaker endpoint.
Real-time recommendation inference
The inference phase consists of the following steps:
The client application makes an inference request to the API gateway.
The API gateway sends the request to Lambda, which makes an inference request to the model in the SageMaker endpoint to request a list of recommendations.
Lambda receives the list of recommendations and provides them to the API gateway.
The API gateway provides the list of recommendations to the client application using the Recommendation API.
Recommendation model using NCF
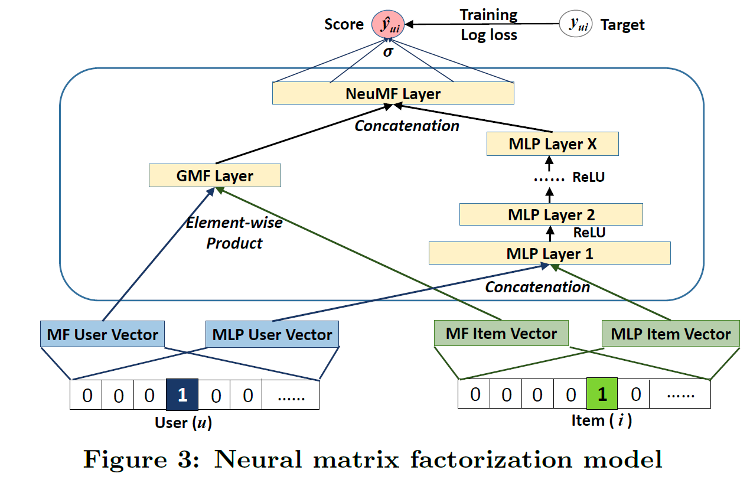
NCF is an algorithm based on a paper presented at the International World Wide Web Conference in 2017. It is an algorithm that covers the limitations of linear matrix factorization, which is often used in existing recommendation systems, with collaborative filtering based on the neural net. By adding non-linearity through the neural net, the authors were able to model a more complex relationship between users and items. The data for NCF is interaction data where users react to items, and the overall structure of the model is shown in the following figure (source: https://arxiv.org/abs/1708.05031).
Although NCF has a simple model architecture, it has shown a good performance, which is why we chose it to be the prototype for our MLOps platform. For more information about the model, refer to the paper Neural Collaborative Filtering.
In the following sections, we discuss how this solution helped us build the aforementioned MLOps components:
Data preprocessing
Automating model training and deployment
Real-time inference through model serving
CI/CD structure
MLOps component 1: Data preprocessing
For NCF, we used user-item interaction data, which requires significant resources to process the raw data collected at the application and transform it into a form suitable for learning. With Amazon EMR, which provides fully managed environments like Apache Hadoop and Spark, we were able to process data faster.
The data preprocessing batches were created by writing a shell script to run Amazon EMR through AWS Command Line Interface (AWS CLI) commands, which we registered to Airflow to run at specific intervals. When the preprocessing batch was complete, the training/test data needed for training was partitioned based on runtime and stored in Amazon S3. The following is an example of the AWS CLI command to run Amazon EMR:
MLOps component 2: Automated training and deployment of models
In this section, we discuss the components of the model training and deployment pipeline.
Event-based pipeline automation
After the preprocessing batch was complete and the training/test data was stored in Amazon S3, this event invoked CodeBuild and ran the training pipeline in SageMaker. In the process, the version of the result file of the preprocessing batch was recorded, enabling dynamic control of the version and management of the pipeline run history. We used EventBridge, Lambda, and CodeBuild to connect the data preprocessing steps run by Amazon EMR and the SageMaker learning pipeline on an event-based basis.
EventBridge is a serverless service that implements rules to receive events and direct them to destinations, based on the event patterns and destinations you establish. The initial role of EventBridge in our configuration was to invoke a Lambda function on the S3 object creation event when the preprocessing batch stored the training dataset in Amazon S3. The Lambda function dynamically modified the buildspec.yml file, which is indispensable when CodeBuild runs. These modifications encompassed the path, version, and partition information of the data that needed training, which is crucial for carrying out the training pipeline. The subsequent role of EventBridge was to dispatch events, instigated by the alteration of the buildspec.yml file, leading to running CodeBuild.
CodeBuild was responsible for building the source code where the SageMaker pipeline was defined. Throughout this process, it referred to the buildspec.yml file and ran processes such as cloning the source code and installing the libraries needed to build from the path defined in the file. The Project Build tab on the CodeBuild console allowed us to review the build’s success and failure history, along with a real-time log of the SageMaker pipeline’s performance.
SageMaker pipeline for training
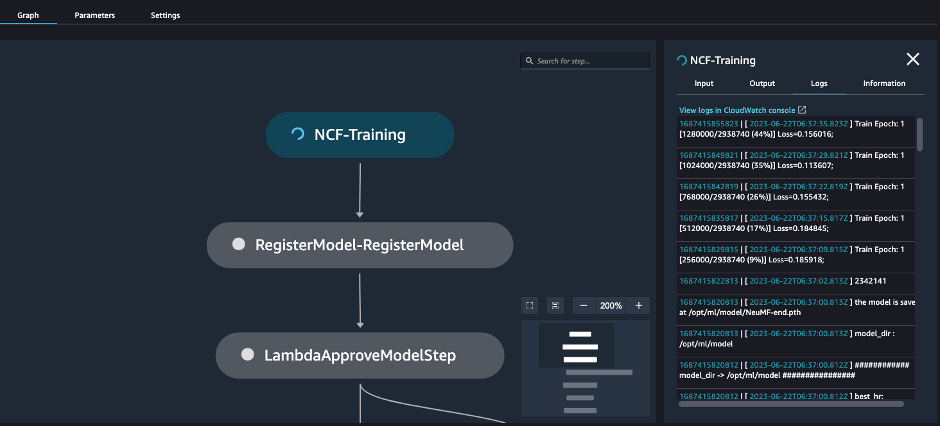
SageMaker Pipelines helps you define the steps required for ML services, such as preprocessing, training, and deployment, using the SDK. Each step is visualized within SageMaker Studio, which is very helpful for managing models, and you can also manage the history of trained models and endpoints that can serve the models. You can also set up steps by attaching conditional statements to the results of the steps, so you can adopt only models with good retraining results or prepare for learning failures. Our pipeline contained the following high-level steps:
Model training
Model registration
Model creation
Model deployment
Each step is visualized in the pipeline in Amazon SageMaker Studio, and you can also see the results or progress of each step in real time, as shown in the following screenshot.
Let’s walk through the steps from model training to deployment, using some code examples.
Train the model
First, you define a PyTorch Estimator to use for training and a training step. This requires you to have the training code (for example, train.py) ready in advance and pass the location of the code as an argument of the source_dir. The training step runs the training code you pass as an argument of the entry_point. By default, the training is done by launching the container in the instance you specify, so you’ll need to pass in the path to the training Docker image for the training environment you’ve developed. However, if you specify the framework for your estimator here, you can pass in the version of the framework and Python version to use, and it will automatically fetch the version-appropriate container image from Amazon ECR.
When you’re done defining your PyTorch Estimator, you need to define the steps involved in training it. You can do this by passing the PyTorch Estimator you defined earlier as an argument and the location of the input data. When you pass in the location of the input data, the SageMaker training job will download the train and test data to a specific path in the container using the format /opt/ml/input/data/<channel_name> (for example, /opt/ml/input/data/train).
In addition, when defining a PyTorch Estimator, you can use metric definitions to monitor the learning metrics generated while the model is being trained with Amazon CloudWatch. You can also specify the path where the results of the model artifacts after training are stored by specifying estimator_output_path, and you can use the parameters required for model training by specifying model_hyperparameters. See the following code:
Create a model package group
The next step is to create a model package group to manage your trained models. By registering trained models in model packages, you can manage them by version, as shown in the following screenshot. This information allows you to reference previous versions of your models at any time. This process only needs to be done one time when you first train a model, and you can continue to add and update models as long as they declare the same group name.
See the following code:
Add a trained model to a model package group
The next step is to add a trained model to the model package group you created. In the following code, when you declare the Model class, you get the result of the previous model training step, which creates a dependency between the steps. A step with a declared dependency can only be run if the previous step succeeds. However, you can use the DependsOn option to declare a dependency between steps even if the data is not causally related.
After the trained model is registered in the model package group, you can use this information to manage and track future model versions, create a real-time SageMaker endpoint, run a batch transform job, and more.
Create a SageMaker model
To create a real-time endpoint, an endpoint configuration and model is required. To create a model, you need two basic elements: an S3 address where the model’s artifacts are stored, and the path to the inference Docker image that will run the model’s artifacts.
When creating a SageMaker model, you must pay attention to the following steps:
Provide the result of the model training step, step_train.properties.ModelArtifacts.S3ModelArtifacts, which will be converted to the S3 path where the model artifact is stored, as an argument of the model_data.
Because you specified the PyTorchModel class, framework_version, and py_version, you use this information to get the path to the inference Docker image through Amazon ECR. This is the inference Docker image that is used for model deployment. Make sure to enter the same PyTorch framework, Python version, and other details that you used to train the model. This means keeping the same PyTorch and Python versions for training and inference.
Provide the inference.py as the entry point script to handle invocations.
This step will set a dependency on the model package registration step you defined via the DependsOn option.
Create a SageMaker endpoint
Now you need to define an endpoint configuration based on the created model, which will create an endpoint when deployed. Because the SageMaker Python SDK doesn’t support the step related to deployment (as of this writing), you can use Lambda to register that step. Pass the necessary arguments to Lambda, such as instance_type, and use that information to create the endpoint configuration first. Because you’re calling the endpoint based on endpoint_name, you need to make sure that variable is defined with a unique name. In the following Lambda function code, based on the endpoint_name, you update the model if the endpoint exists, and deploy a new one if it doesn’t:
To get the Lambda function into a step in the SageMaker pipeline, you can use the SDK associated with the Lambda function. By passing the location of the Lambda function source as an argument of the function, you can automatically register and use the function. In conjunction with this, you can define LambdaStep and pass it the required arguments. See the following code:
Create a SageMaker pipeline
Now you can create a pipeline using the steps you defined. You can do this by defining a name for the pipeline and passing in the steps to be used in the pipeline as arguments. After that, you can run the defined pipeline through the start function. See the following code:
After this process is complete, an endpoint is created with the trained model and is ready for use based on the deep learning-based model.
MLOps component 3: Real-time inference with model serving
Now let’s see how to invoke the model in real time from the created endpoint, which can also be accessed using the SageMaker SDK. The following code is an example of getting real-time inference values for input values from an endpoint deployed via the invoke_endpoint function. The features you pass as arguments to the body are passed as input to the endpoint, which returns the inference results in real time.
When we configured the inference function, we had it return the items in the order that the user is most likely to like among the items passed in. The preceding example returns items from 1–25 in order of likelihood of being liked by the user at index 0.
We added business logic to the feature, configured it in Lambda, and connected it with an API gateway to implement the API’s ability to return recommended items in real time. We then conducted performance testing of the online service. We load tested it with Locust using five g4dn.2xlarge instances and found that it could be reliably served in an environment with 1,000 TPS.
MLOps component 4: CI/CD structure
A CI/CD structure is a fundamental part of DevOps, and is also an important part of organizing an MLOps environment. AWS CodeCommit, AWS CodeBuild, AWS CodeDeploy, and AWS CodePipeline collectively provide all the functionality you need for CI/CD, from code shaping to deployment, build, and batch management. The services are not only linked to the same code series, but also to other services such as GitHub and Jenkins, so if you have an existing CI/CD structure, you can use them separately to fill in the gaps. Therefore, we expanded our CI/CD structure by linking only the CodeBuild configuration described earlier to our existing CI/CD pipeline.
We linked our SageMaker notebooks with GitLab for code management, and when we were done, we replicated them to Amazon S3 via Jenkins. After that, we set the S3 path to the default repository path of the NCF CodeBuild project as described earlier, so that we could build the project with CodeBuild.
Conclusion
So far, we’ve seen the end-to-end process of configuring an MLOps environment using AWS services and providing real-time inference services based on deep learning models. By configuring an MLOps environment, we’ve created a foundation for providing high-quality services based on various algorithms to our customers. We’ve also created an environment where we can quickly proceed with prototype development and deployment. The NCF we developed with the prototyping algorithm was also able to achieve good results when it was put into service. In the future, the MLOps platform can help us quickly develop and experiment with models that match LotteON data to provide our customers with a progressively higher-quality recommendation experience.
Using SageMaker in conjunction with various AWS services has given us many advantages in developing and operating our services. As model developers, we didn’t have to worry about configuring the environment settings for frequently used packages and deep learning-related frameworks because the environment settings were configured for each library, and we felt that the connectivity and scalability between AWS services using AWS CLI commands and related SDKs were great. Additionally, as a service operator, it was good to track and monitor the services we were running because CloudWatch connected the logging and monitoring of each service.
You can also check out the NCF and MLOps configuration for hands-on practice on our GitHub repo (Korean).
We hope this post will help you configure your MLOps environment and provide real-time services using AWS services.
About the Authors
SeungBum Shim is a data engineer in the Lotte E-commerce Recommendation Platform Development Team, responsible for discovering ways to use and improve recommendation-related products through LotteON data analysis, and developing MLOps pipelines and ML/DL recommendation models.
HyeKyung Yang is a research engineer in the Lotte E-commerce Recommendation Platform Development Team and is in charge of developing ML/DL recommendation models by analyzing and utilizing various data and developing a dynamic A/B test environment.
Jieun Lim is a data engineer in the Lotte E-commerce Recommendation Platform Development Team and is in charge of operating LotteON’s personalized recommendation system and developing personalized recommendation models and dynamic A/B test environments.
Jesam Kim is an AWS Solutions Architect and helps enterprise customers adopt and troubleshoot cloud technologies and provides architectural design and technical support to address their business needs and challenges, especially in AIML areas such as recommendation services and generative AI.
Gonsoo Moon is an AWS AI/ML Specialist Solutions Architect and provides AI/ML technical support. His main role is to collaborate with customers to solve their AI/ML problems based on various use cases and production experience in AI/ML.


